Garrattfan's Modelrailroading Pages
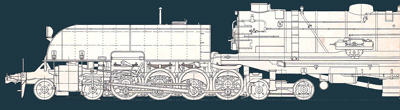
AD60
2.1 Superstructure front unit
|
Instructions [125] to [131], page 16 of the instruction manual
The nice thing about the superstructure of this loco is that it can be built in separate parts parallel to the building of the frame. So when I got fed up with the fiddly work on the frame I started working simultaneously on the front or rear unit's superstructure to get some diversion. |
|
 |
[125] The front tank is a chunky lump of white metal which needs surprisingly little finishing. One good thing to do is sand it on grain 400 emery paper to assure it is completely flat on the bottom.
|
 |
...and remove the few burs there are. Though few they take considerable time as they are very close to some rivet rows. But after some careful work the result was satisfying |
 |
 |
 |
Take a good look at both footplates. They may seem in good shape but white metal bends easily. The front foot plate was definitely warped as this sharp side view shows.
|
 |
The middle of the footplate clears the ruler.
|
 |
After that I found that the footplate would not fit into the tank casting. It just a few tenths of mm too wide. Some scraping corrected that.
This shows once again that it is of utmost importance that you trial fit parts before assembly. This is particularly true when you glue the parts. When soldering test fitting is almost a foolproof part of the process: you put the parts together and then apply solder. When you glue it is less foolproof: you usually first apply the glue and then press the parts together. It is a sorry thing to find out at that very moment that you forget to trial fit... |
 |
[125] The dimples that locate the holes for the anti-vacuum valves should be drilled before soldering the footplates to the tank. I also made a small chamfer. |
 |
[126] Then a nice anecdote. I soldered the front footplate to the tank. I am dead sure I positioned the footplate perfectly but somehow it got astray during in the process. So when I contentedly looked at the footplate after soldering I realised to my horror it had moved backwards by several mm!! As the solder joint is quite long there was no way to reheat it to reposition the footplate. I decided there was no other way than to start all over again. White metal solder has one great feature: it melts at 80C. So I put it in a bin and poured boiling water over it to take it apart. The footplate came loose. In a sudden hunch I shoved it forward and much to my own surprise it fell into the right place. I didn't hesitate: I opened up the cold water tap and cooled the assy causing the solder to set again. The result was perfect ;-) I soldered with hot water!
|
 |
[127] The rear footplate was also added. Some cleaning up was needed but please be careful to apply solder sparingly and from the inside, otherwise the solder will flow under the row of rivets at the lower end of the tank and will be very hard to clean up.
|
No correct fit despite the off-centre spigot |
Instruction [130] notes that the spigot of the anti-vacuum valve (usually referred to as snifter valve) is off centre so the valve fits tightly to the tank. So look carefully how to place them. But even so they would not sit straight along the tank's side.
I reamed the hole a little towards the edge of the footplate until the valve sat exactly vertical. I also removed the rivets that would be covered by the valve. By the way the anti-vacuum valve, or snifting valve, permits air to be drawn by the cylinders. This allows the engine to coast freely when the regulator is closed. Without these valves the cylinders would suck air back in from the smokebox carrying ash and cinders into cylinders which would damage the lining. |
|
|


Sign my
GuestBook